Prep Time: 10 minutes
Cook Time: Approximately 2–2½ hours
Servings: 4–6
Ingredients
- 1 rack baby back ribs or St. Louis-style ribs
- 1 tablespoon yellow mustard, optional
- 3 tablespoons favorite BBQ dry rub
- ½–¾ cup favorite store-bought BBQ sauce
- A little oil for the Blackstone
- Heavy-duty aluminum foil
How to Make Ribs on the Blackstone
1. Prep the Ribs
If the membrane is still attached to the back of the ribs, remove it.
Pat the ribs dry.
If you’re using mustard as a binder, spread approximately 1 tablespoon of yellow mustard over both sides of the rack. You won’t really taste it—it simply helps the seasoning stick.
Don’t want to use mustard? Skip it and apply the rub directly to the ribs.
Season both sides generously with approximately 3 tablespoons of BBQ dry rub, pressing the seasoning into the meat.
Let the ribs sit for about 15 minutes while you heat the Blackstone.
2. Heat the Blackstone
Turn one burner to LOW and leave the other burners off or as low as needed to create a cooler cooking zone.
You’re looking for approximately 275–300°F where the ribs will be cooking.
Preheat the griddle for about 5 minutes.
3. Give the Ribs Some Color
Lightly oil the griddle.
Place the ribs meat-side down over low heat and cook for approximately 4–5 minutes.
Flip and cook bone-side down for another 4–5 minutes.
We’re not trying to cook the ribs through. This step just gives the outside a little extra color and flavor before the slow cook.
4. Wrap the Ribs
Place the rack on a large sheet of heavy-duty aluminum foil.
Wrap the ribs tightly, using a second piece of foil if necessary.
There’s nothing else going into the packet.
No butter. No apple juice. No brown sugar. No honey.
Just seasoned ribs.
5. Cook Low & Slow
Place the wrapped ribs bone-side down on the cooler area of the Blackstone.
If your Blackstone has a hood, close it.
If you don’t have a hood, place a large disposable aluminum roasting pan upside down over the foil-wrapped ribs to help trap heat.
Keep the cooking area around 275–300°F.
Cook approximately:
Baby back ribs: 1½–2 hours
St. Louis-style ribs: 2–2½ hours
Rotate the foil packet 180 degrees about every 30 minutes so one end isn’t constantly sitting over the hotter part of the griddle.
6. Check the Ribs
Carefully open the foil.
The meat should be pulling back slightly from the ends of the bones.
Slide a toothpick between two bones. If it goes through the meat easily with very little resistance, they’re ready for sauce.
If they’re still tough, wrap them back up and cook for another 20–30 minutes.
7. Sauce & Finish on the Blackstone
Now we’re getting to the good part.
Remove the ribs from the foil.
Place them bone-side down on the Blackstone over medium-low heat.
Brush the meat generously with your favorite bottled BBQ sauce.
Cook for approximately 3–4 minutes.
Flip the ribs meat-side down and cook for only 1–2 minutes.
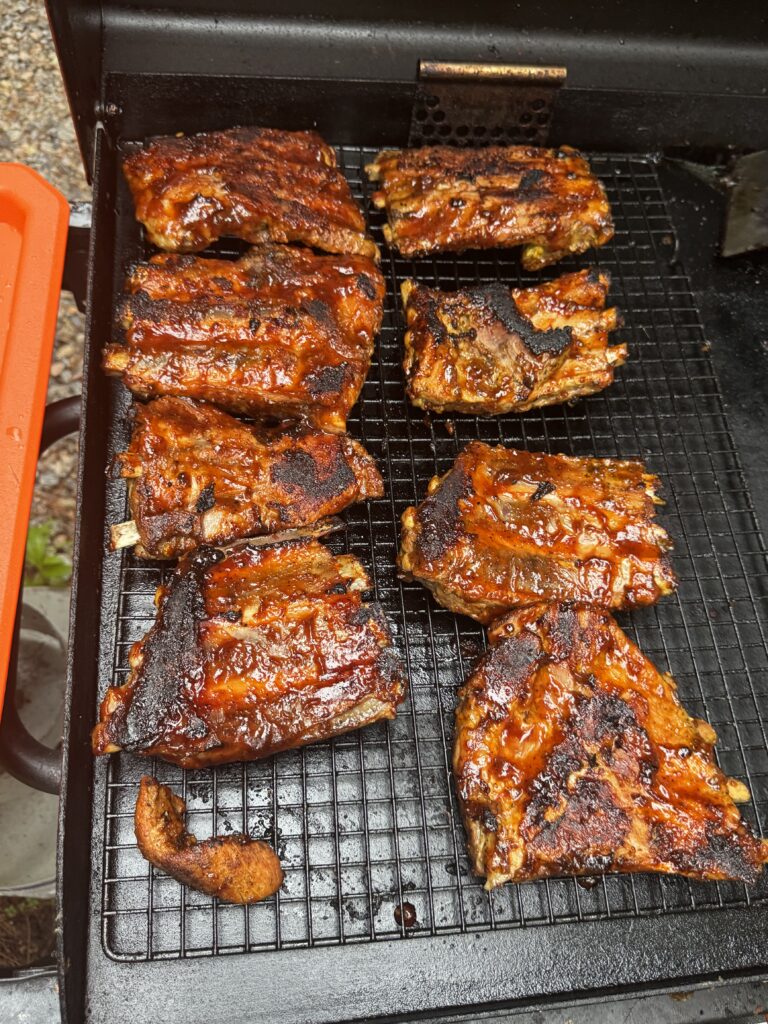
Flip them back over, brush on another layer of BBQ sauce and cook another 2–3 minutes, until the sauce is hot, sticky and caramelized.
Don’t wander away during this part.
Most bottled BBQ sauces contain plenty of sugar, and they’ll burn quickly against a hot griddle.
We’re going for sticky ribs—not Blackstone charcoal.
8. Rest & Slice
Remove the ribs from the Blackstone and let them rest for approximately 10 minutes.
Slice between the bones and serve with extra BBQ sauce on the side.
What’s the Best Rub and BBQ Sauce?
Use what you like.
Seriously.
You don’t need a homemade 14-ingredient spice blend to make good ribs at camp.
Grab your favorite BBQ dry rub and a bottle of BBQ sauce and you’re basically there.
A smoky or brown-sugar BBQ rub works great with a classic bottled BBQ sauce. If you like some heat, use a spicy rub or spicy BBQ sauce.
The bottled sauce already brings plenty of sweetness, which is exactly why we’re keeping everything else simple.
Camp Chaos Tip
Rub first. Sauce last.
Don’t coat the ribs in BBQ sauce before the long cook.
The sugars in bottled BBQ sauce can burn on the Blackstone long before the ribs become tender.
Instead, let the dry rub season the meat during the slow cook.
Once the ribs are tender, unwrap them, add the sauce and give them those final few minutes directly on the Blackstone.
That’s when the sauce gets hot, sticky and caramelized.
What to Serve With Blackstone Ribs
You’ve already got the Blackstone running, so you might as well put it to work.
Grilled corn, asparagus, potatoes or mixed vegetables can all go onto the griddle while the ribs rest.
Add some coleslaw or potato salad from the cooler and you’ve got a ridiculously easy campground dinner.
And obviously, nobody around here is going to object to a cold camp cocktail alongside them.
Can You Really Make Good Ribs on a Blackstone?
Absolutely.
Are they going to be exactly like ribs that spent six hours in a smoker?
No.
But that’s not what we’re trying to do.
This is about taking one rack of ribs, BBQ rub and bottled BBQ sauce and turning them into a great campground dinner using equipment you already have.
No smoker.
No complicated wrapping mixture.
No hauling half the kitchen to camp.
Just season, wrap, cook, sauce and eat.
Camp Chaos Verdict:
Proof that good ribs don’t need to be complicated. 🔥🍖